Role, group, and permissions management and access controls (RBAC)
TABLE OF CONTENTS
- Introduction
- Definitions
- What's changed, what hasn't
- What TMC administrators can manage
- What company administrators can manage
- System user groups, roles, and permissions
- Managing groups and roles
- Example usage scenarios
- Related topics
Introduction
Role-based Access Control (RBAC) is Spotnana's permission management feature that gives you the ability to precisely control the data that your users can view and the actions they can take in your travel program.
Spotnana comes preconfigured with certain user groups. Each user group is associated with one or more predefined roles. You can assign your users to these groups as needed. You also have the ability to create custom user groups and assign them specific roles, actions, and permissions tailored to your organization's needs.
Definitions
This section contains some key definitions you will need to understand in order to properly administer RBAC.
User groups
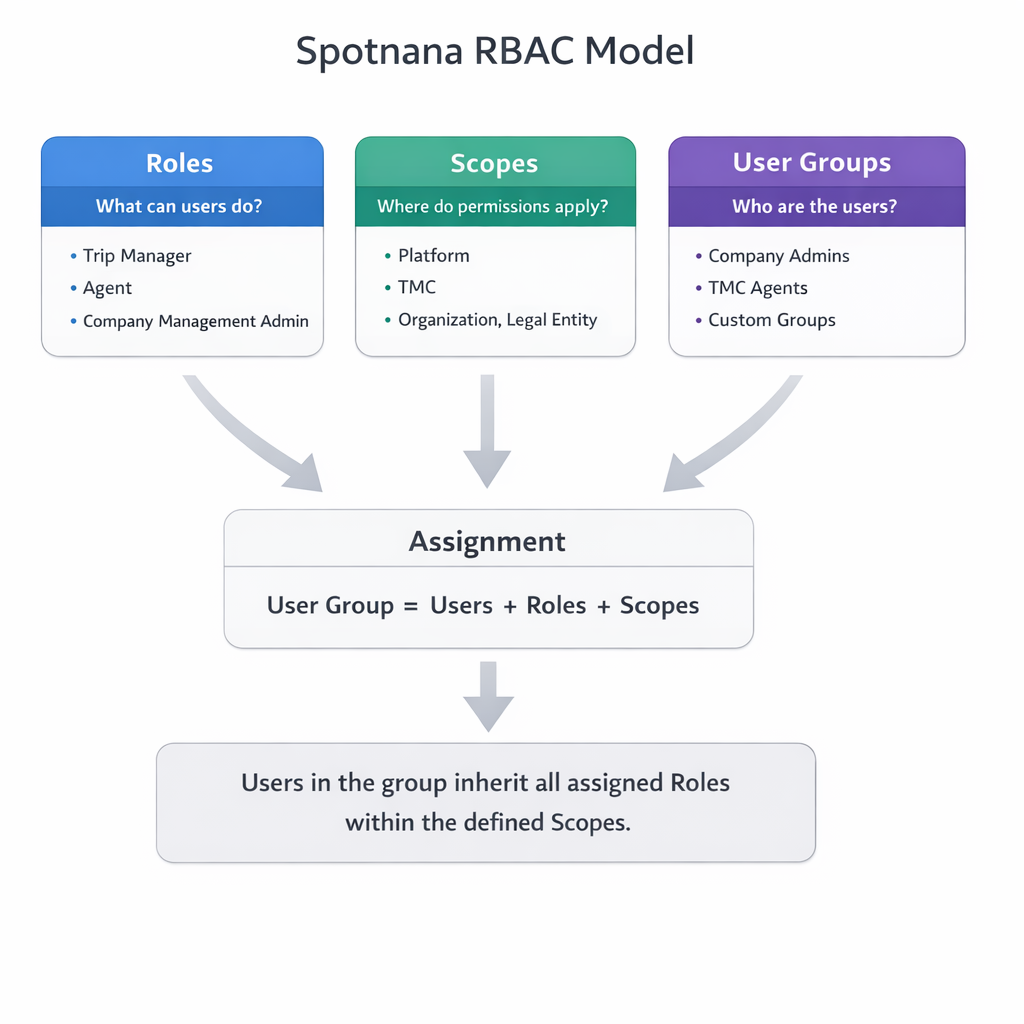
A named collection of users who share common roles and scopes. Scope defines the actions a user with a role can take and the data they can see (see Scopes below for more detail).
Each user can be part of multiple user groups (and will automatically inherit the roles contained in them).
The names of the user groups that come pre-defined with the system can’t be edited but you can add and remove roles and users to and from them as needed.You can also create custom user groups and add roles and users to them as needed.
Roles
A collection of permissions that define the actions that users with that role can take and the data they can see. Roles can be associated with a group (of users) or with individual users. Roles are used to represent job functions or a set of responsibilities (e.g., Reports manager).
You can't create new roles.
Scope
Scope is used to define the data that users with a given role can view and act on in the system. Scope is used to define the data to which a given set of role-based permissions apply. For example, scope allows administrators to control the companies to which a given permission applies.
By default, all company roles grant access to all company data on the pages associated with each role (e.g., the Trips page).
By default, all TMC roles grant access to all data on the pages associated with each role for all companies managed by the TMC.
However, administrators can edit the scope of a role to limit the data users with that role have access to (e.g., limit an TMC agent to only 6 of the TMC's 10 client companies).
Scopes are hierarchical (from broad to narrow):
TMC - All companies under a specific TMC
Organization - Everything under a specific company
Legal Entity (not available in the initial release) - Only a subset of a company
Individual Traveler (not available in the initial release) - Specific people
Illustration of user groups, roles, and scopes
The following diagram illustrates how these three building blocks are used together:
What's changed, what hasn't
This section is mainly for administrators who actively manage role assignments. If you are an administrator who rarely changes roles (e.g., promoting a company administrator to a TMC administrator, or reassigning a TMC administrator to an agent), you will rarely need this information.
No effect on your existing users: This means every existing user on your platform has already been mapped and assigned to a user group that provides them with the same access they had before. None of the travelers, arrangers, administrators, or agents within your system will lose access to anything they already have access to or the ability to do. The migration is transparent and unnoticed by all users (except the administrators who assign and scope roles and groups).The following table lists the previous roles and the groups they are now represented by in the new RBAC model:
What changes for you, as an administrator, is where and how you configure access:
Actions | Before | Now |
| Where | Program > Users > Roles | Program > People > Groups and roles |
| How you change a user's access | Select a role from the Roles menu within their profile. | Add or remove the user to or from a user group. |
| Roles allowed per user | Each user can only belong to a single role. | Each user can belong to one or more groups. Each group has roles and scopes to control what users in that group have permissions to view and do. |
| Scoping | Fixed per role. | Configurable per group. |
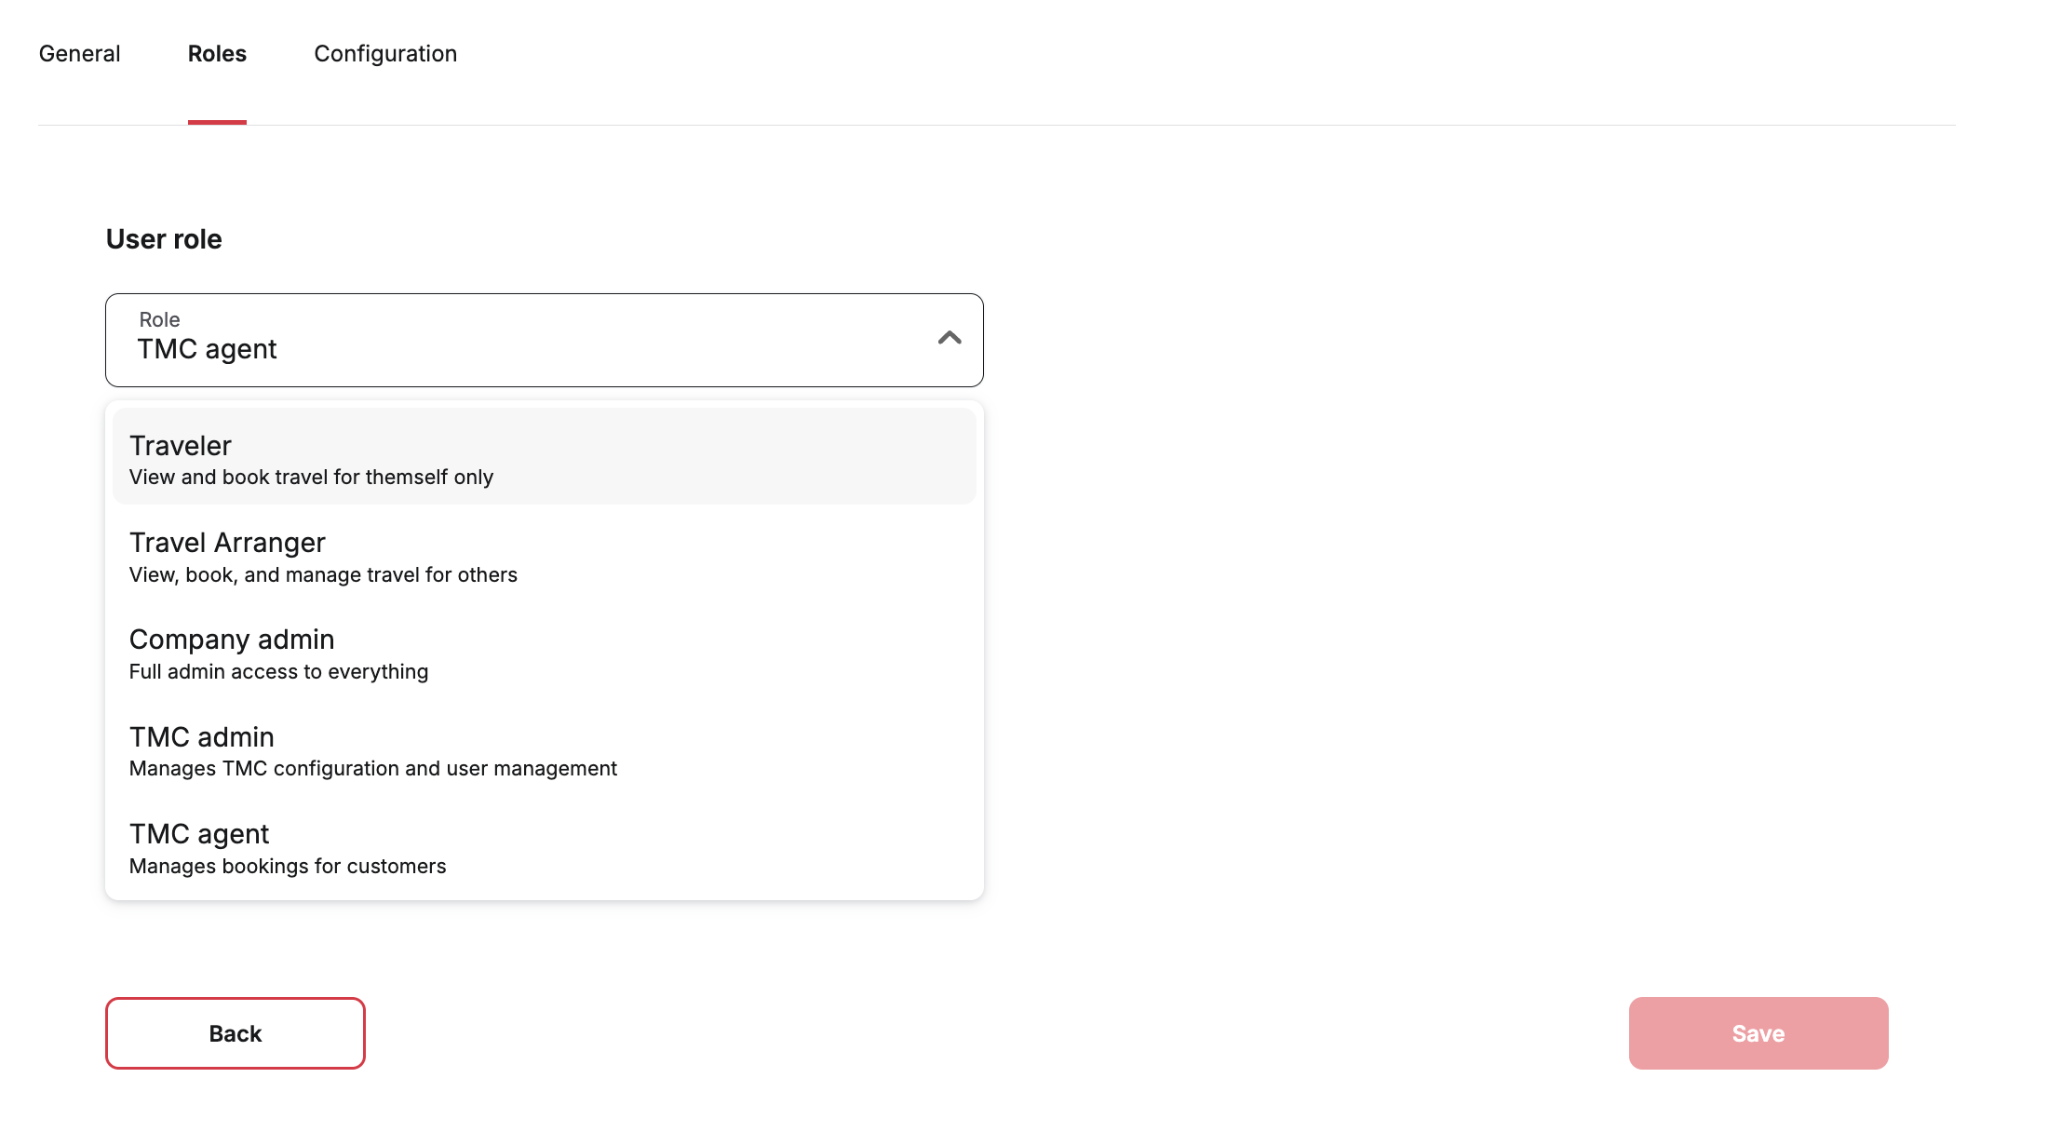
Before
An example of the old static role menu on a user’s profile (Program > Users > Roles > user record > Roles tab).
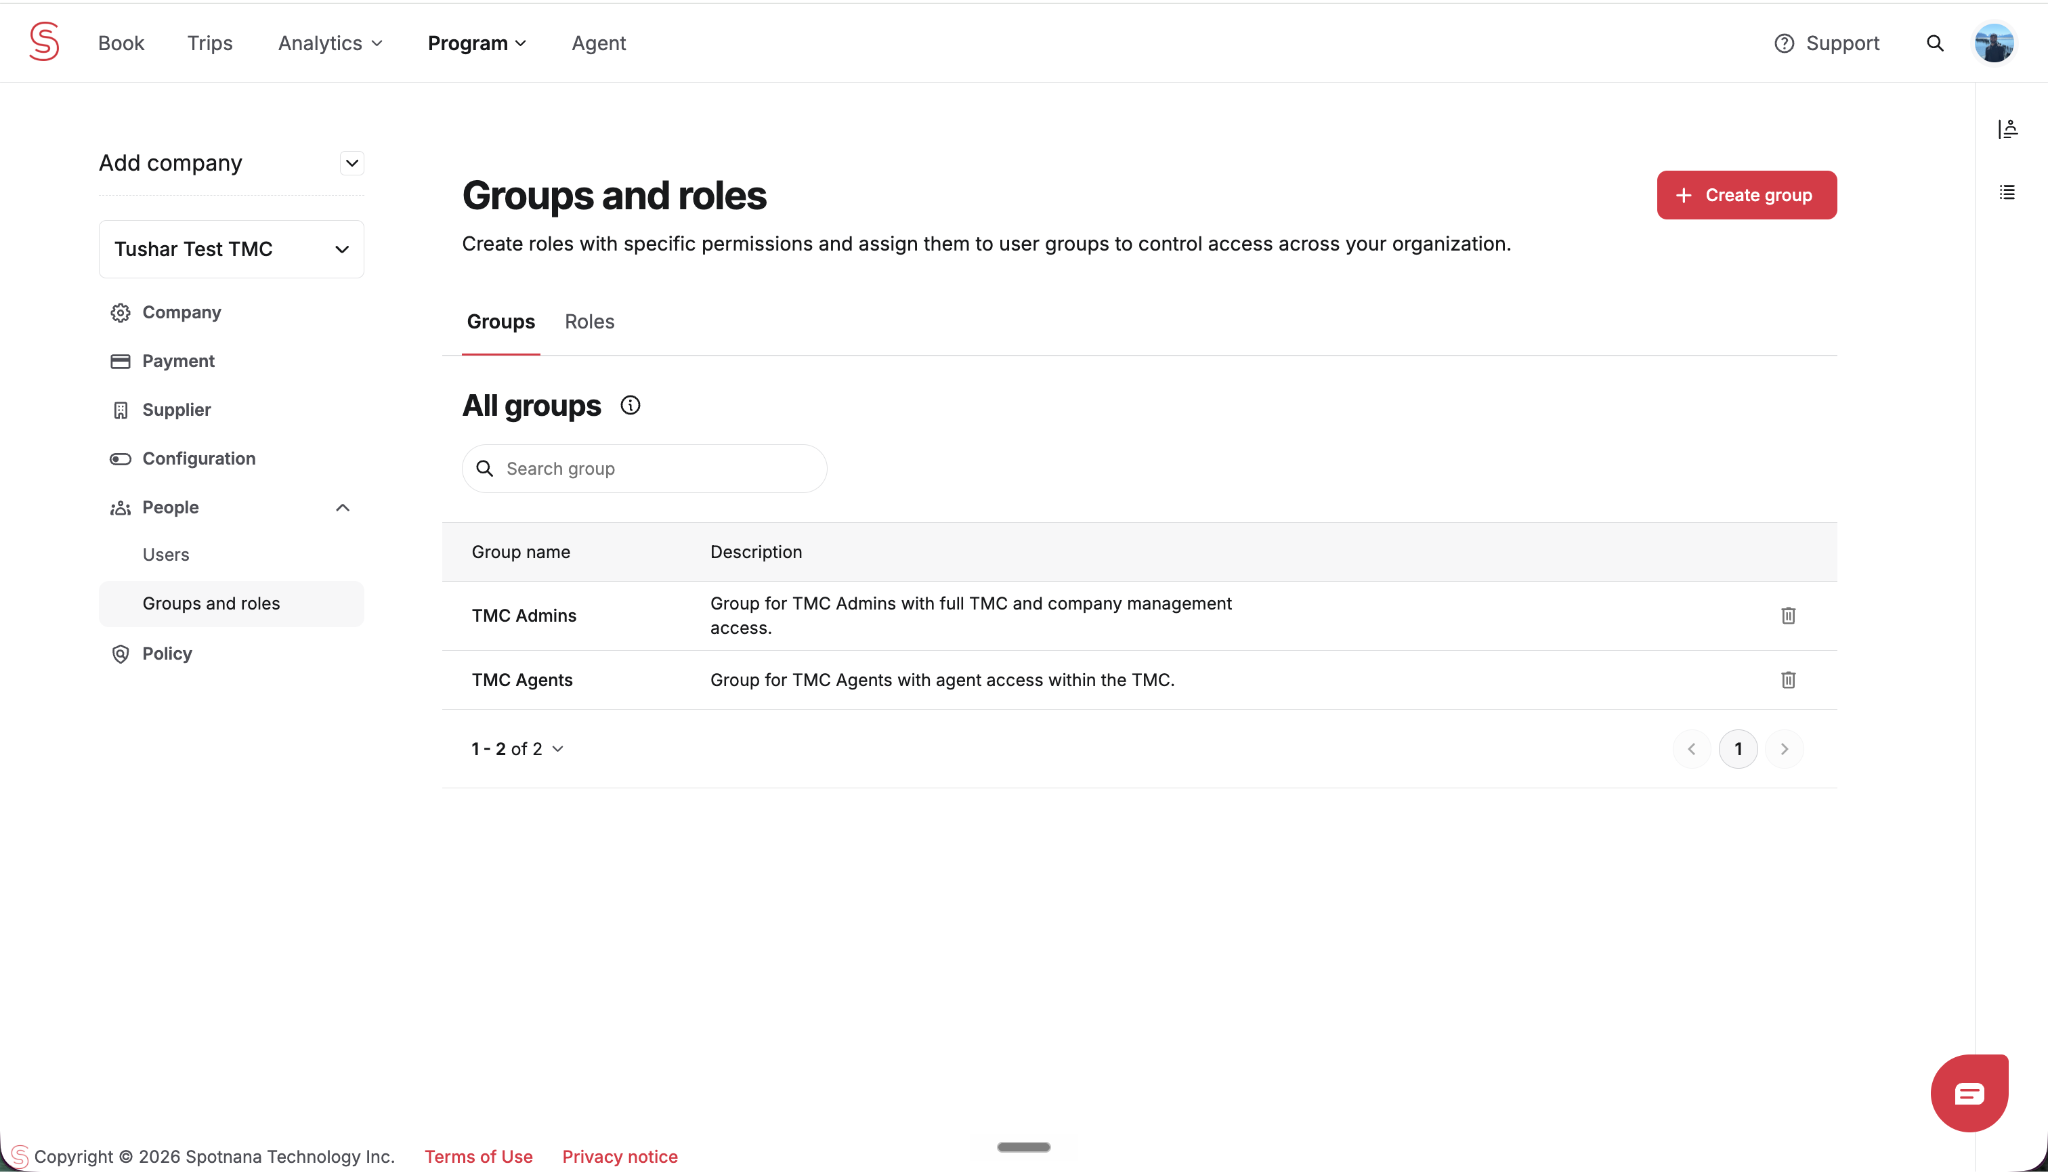
Now
An example of the new Groups and Roles page (Program > People > Groups and roles > Groups tab) showing the list of system and custom groups.
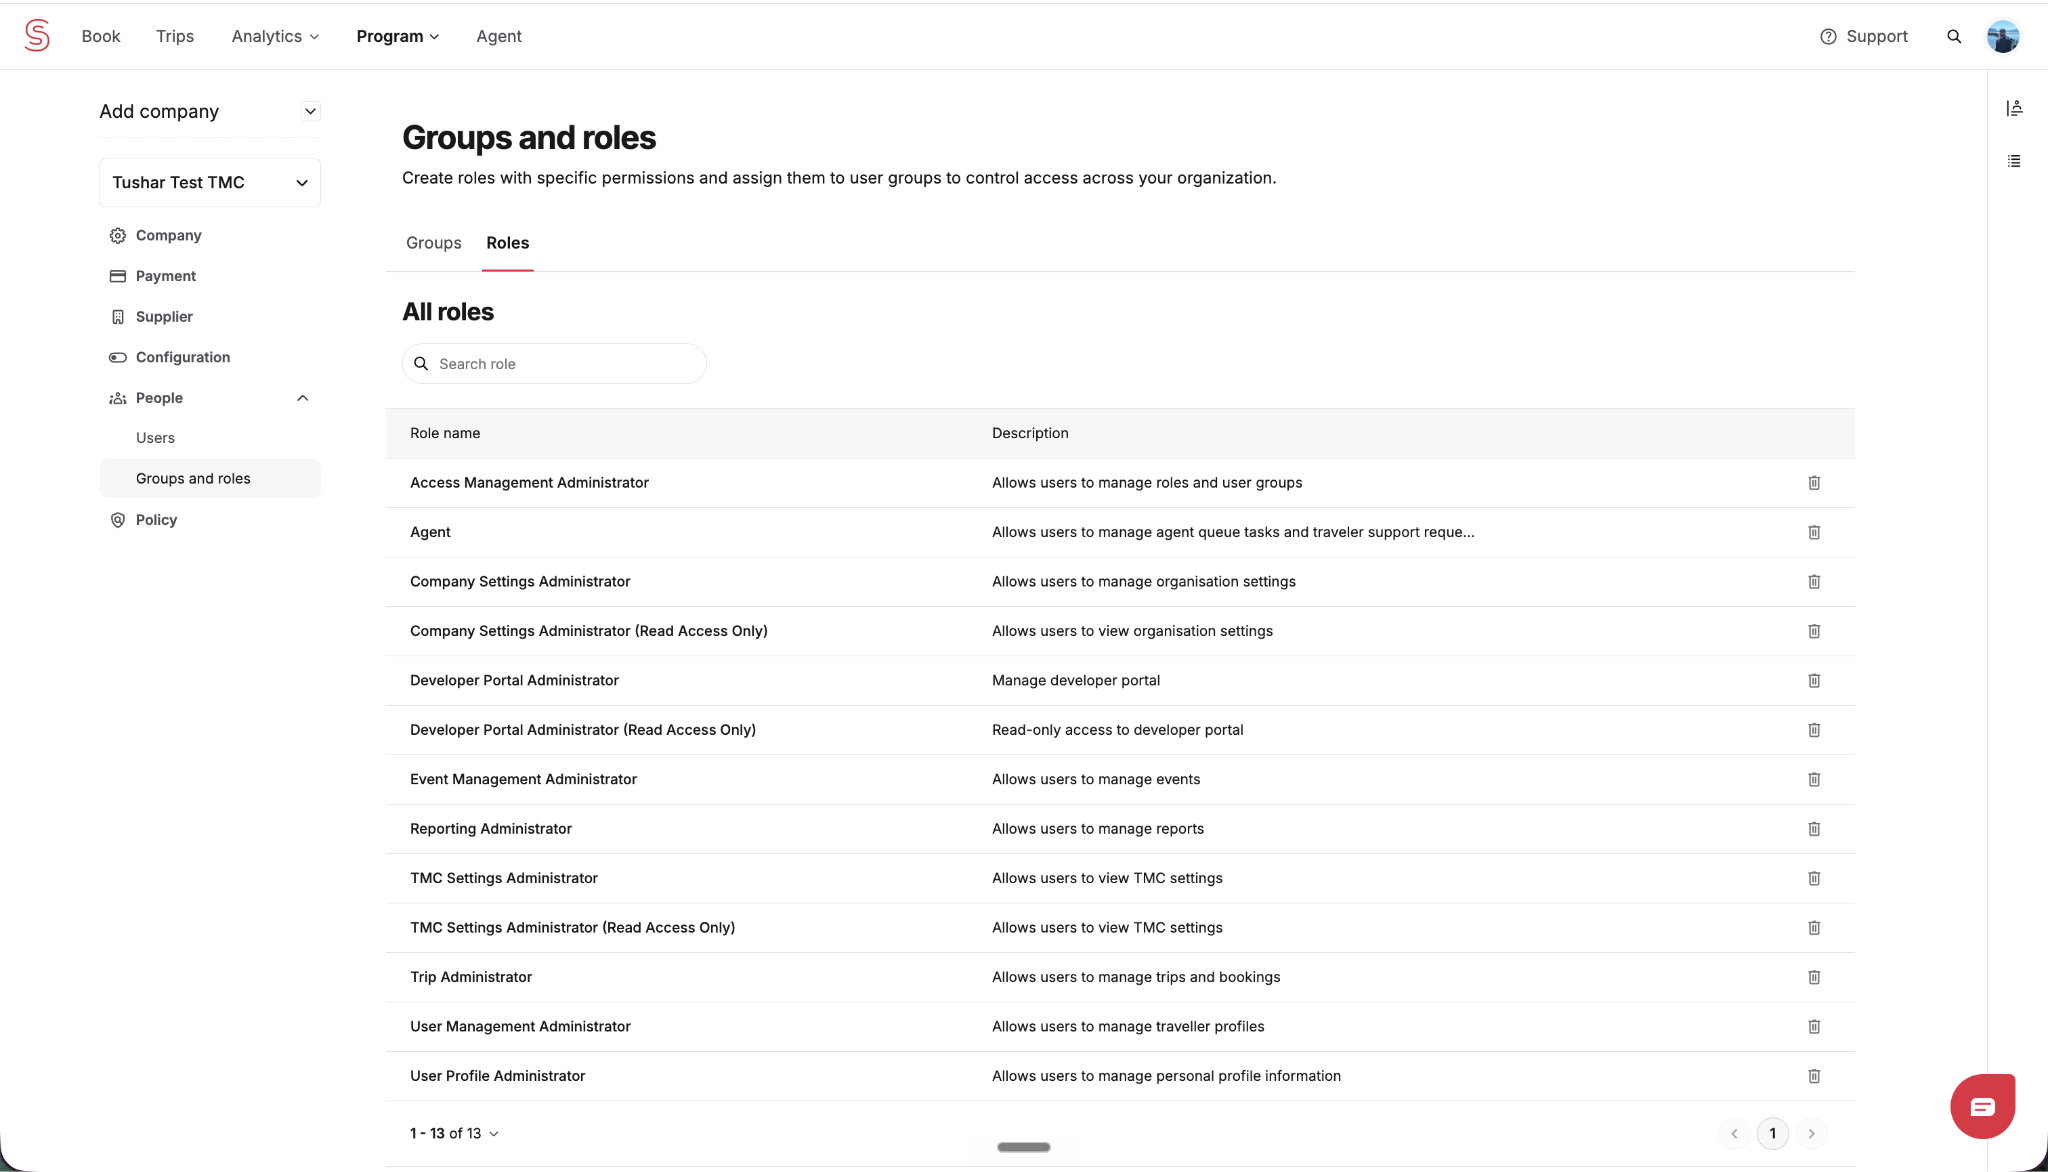
Now showing the Roles tab.
What TMC administrators can manage
TMC administrators are able to create specialized agent groups (e.g., agents dedicated to specific client accounts) who only manage those accounts. This improves security and operational efficiency. Agents benefit from clearer, more focused access to the bookings and travelers they're responsible for, reducing confusion and potential errors.
TMC administrators are able to view, edit, and create user groups that are shared by and have access to the data of more than one of their client companies. For example, a TMC administrator can create a user group that gives specific agents the ability to manage trips for multiple clients.
The system-provided user groups to which TMC administrators automatically have access are TMC Agents and TMC Admins (as well as all company-level roles). For details on the roles that are contained within these groups and what permissions these roles provide, see the System user groups, roles, and permissions section below.
What company administrators can manage
Company administrators are able to create custom administrative roles for their organization such as separate administrators for reporting, user management, or travel policy without giving everyone full access to all data and functions.
Company administrators are able to view, edit, and create user groups within their organization/company. For example, a TMC administrator can create a user group that gives specific users the ability to view all analytics reports but not access the trips of the travelers.
The system-provided user groups to which Company administrators automatically have access are Company Arrangers and Company Administrators. For details on the roles that are contained within these groups and what permissions these roles provide, see the System user groups, roles, and permissions section below.
System user groups, roles, and permissions
This section describes the various user groups, user roles, and permissions that are preconfigured in the system. Administrators can’t change the name of or delete these groups and roles, but they can add and remove users and roles to and from these groups.
Company level user groups and roles
The following user groups and roles are available to each company and TMC.
Any role that grants the ability to manage settings will allow users with that role to edit those settings. Any role that grants read-only access will only allow users with that role to view but not edit those settings.TMC level user groups and roles
The following user groups and roles are only available to TMCs. All groups and roles available to company administrators are also available to TMC administrators for all the companies they manage.
Initially, all TMC level roles will have access to all companies serviced by the TMC. However, you can always configure the system to limit the scope of a role to only specific companies under the TMC.Managing groups and roles
This section describes the various actions administrators can take when managing RBAC. If an action is limited to only TMC administrators, that will be explicitly stated.
You can’t change the name of or delete any of the system user groups. You can add or remove users and roles to and from those groups. You can create custom user groups. You can perform all the same actions on your custom user groups as the system user group. However, for custom user groups, you can also change the name of the group or delete it if desired.
TMC administrators can create custom groups. In addition, depending on how the system has been configured, some company administrators may also be able to create custom groups.Add a user to a group
TMC and company administrators have the ability to add users to groups. Adding a user to a group will cause that user to automatically gain access to all roles (and scopes) associated with that group.
Administrators can also individually add users to specific roles, but it is considered more efficient for the majority of use cases to manage user access to roles via the groups they are a member of.Select Program from the top menu.
If you are a TMC administrator, select the client company for which you want to add a user to a group from the menu on the top left.
Open the People branch in the left hand navigation and select Groups and roles.
Select the Groups tab. The list of groups will be displayed.
Locate and select the group to which you want to add the user. The group name page will be displayed.
Select the Members tab.
Click Add members.
Depending on whether you will be adding members manually or via a CSV file that you upload, select either Add manually or CSV upload from the menu.
If you select Add manually, the Add members dialog box will appear. Use the search field to find and select the desired users. Click Add when done.
If you select CSV upload, the Upload CSV file dialog box will appear. Follow the onscreen instructions to populate your CSV file and then select the file. Click Continue when done.
Remove a user from a group
TMC and company administrators have the ability to remove users from groups. Removing a user from a group will cause that user to automatically lose access to all roles (and scopes) associated with that group.
Administrators can also individually remove users from specific roles, but it is considered more efficient for the majority of use cases to manage user access to roles via the groups they are a member of.Select Program from the menu.
Select the client company for which you want to remove a user from a group from the menu on the top left.
Open the People branch in the left hand navigation and select Groups and roles.
Select the Groups tab. The list of groups will be displayed.
Locate and select the group from which you want to remove the user. The group name page will be displayed.
Select the Members tab.
Locate the user you wish to remove from the group and click delete (trashcan icon) in its row. When prompted to confirm this action, click Remove. The user will be removed from the group. The user will lose access to all roles associated with the group. However, the user may still retain access to some of the roles if they were assigned to those roles (i.e., not by being a member of a group). In addition, if a user is a member of another group that still grants them access to some of the same roles, they will still retain access to those roles.
Add a role to a group
TMC and company administrators have the ability to add roles to groups.
Select Program from the menu.
Select the client company for which you want to add a role to a group from the menu on the top left.
Open the People branch in the left hand navigation and select Groups and roles.
Select the Groups tab. The list of groups will be displayed.
Locate and select the group to which you want to add a role. The group name page will be displayed.
Select the Roles and scopes tab.
Locate the role you wish to remove from the group and click delete (trashcan icon) in its row. When prompted to confirm this action, click Remove.
The selected role will be removed from the group. All users in the group will lose access to that role. However, some users may still retain access to the role if they are a member of other groups that grant them access to it or they have been individually given access to that role.
Change the scope of a role within a group
TMC and company administrators have the ability to edit the scope associated with a role in a group. Editing the scope will change the data within the platform that the role will have access to.
Select Program from the menu.
Select the client company for which you want to change the scope of a role from the menu on the top left.
Open the People branch in the left hand navigation and select Groups and roles.
Select the Groups tab. The list of groups will be displayed.
Locate and select the group that contains the role for which you wish to edit the scope. The group name page will be displayed.
Select the Roles and scopes tab.
Locate the role for which you wish to edit the scope and click edit (pencil icon) in its row. The Edit assigned role dialog box will appear.
Define the scope that the role should have.
You must then also select the conditions that will govern that role’s access. This is also referred to as the scope of the access. Use the fields provided to define the conditional access. For example: If Contracting TMC is one of [TMC name].
To add more conditions to be ANDed together, click Add condition.
To add more conditions to be ORed together, click Add scope.
To modify an existing condition, edit the values as needed.
To remove a condition, click delete (trashcan icon) in its row.
When done, click Save changes.
Remove a role from a group
TMC and company administrators can remove roles from the user groups they manage.
Select Program from the menu.
Select the client company for which you want to remove the role from the menu on the top left.
Open the People branch in the left hand navigation and select Groups and roles.
Select the Groups tab. The list of groups will be displayed.
Locate and select the group from which you wish to remove a role. The group name page will be displayed.
Select the Roles and scopes tab.
Locate the role you wish to remove and click delete (trashcan icon) in its row. When prompted to confirm this action, click Remove. The role will be removed from the group. All users in the group will lose access to the role. However, some users may still have access to the role if they were assigned to it individually (i.e., not by being a member of a group). In addition, if a user is a member of another group that still grants them access to the role, they will still retain the role.
Create a custom group
TMC administrators can also create custom groups. These groups are in addition to the system groups that come pre-installed.
Select Program from the menu.
Select the client company for which you want to create the custom group from the menu on the top left.
Open the People branch in the left hand navigation and select Groups and roles.
Select the Groups tab. The list of groups will be displayed.
Click Create group. The Create group dialog box will be displayed.
Enter a name and description for the group and click Create.
The group will be created and the [GroupName] page will be displayed. You will then need to assign roles and members to the group.
To add a role to the group, select the Roles and scopes tab.
Click Assign role. The Assign role dialog box will be displayed.
Select the checkbox for each role you wish to assign to the group in the Select roles field.
You must then also select the conditions that will govern that role’s access. This is also referred to as the scope of the access. Use the fields provided to define the conditional access. For example: If Contracting TMC is one of [TMC name]. To add more conditions to be ANDed together, click Add condition. To add more conditions to be ORed together, click Add scope. When done, click Assign.
To add users to the group, select the Members tab.
Click Add members.
Depending on whether you will be adding members manually or via a CSV file that you upload, select either Add manually or CSV upload from the menu.
If you select Add manually, the Add members dialog box will appear. Use the search field to find and select the desired users. Click Add when done.
If you select CSV upload, the Upload CSV file dialog box will appear. Follow the onscreen instructions to populate your CSV file and then select the file. Click Continue when done.
Example usage scenarios
To help you understand how to configure the system’s roles, groups, and scopes to support your actual business scenarios, we’ve provided a few use case examples.
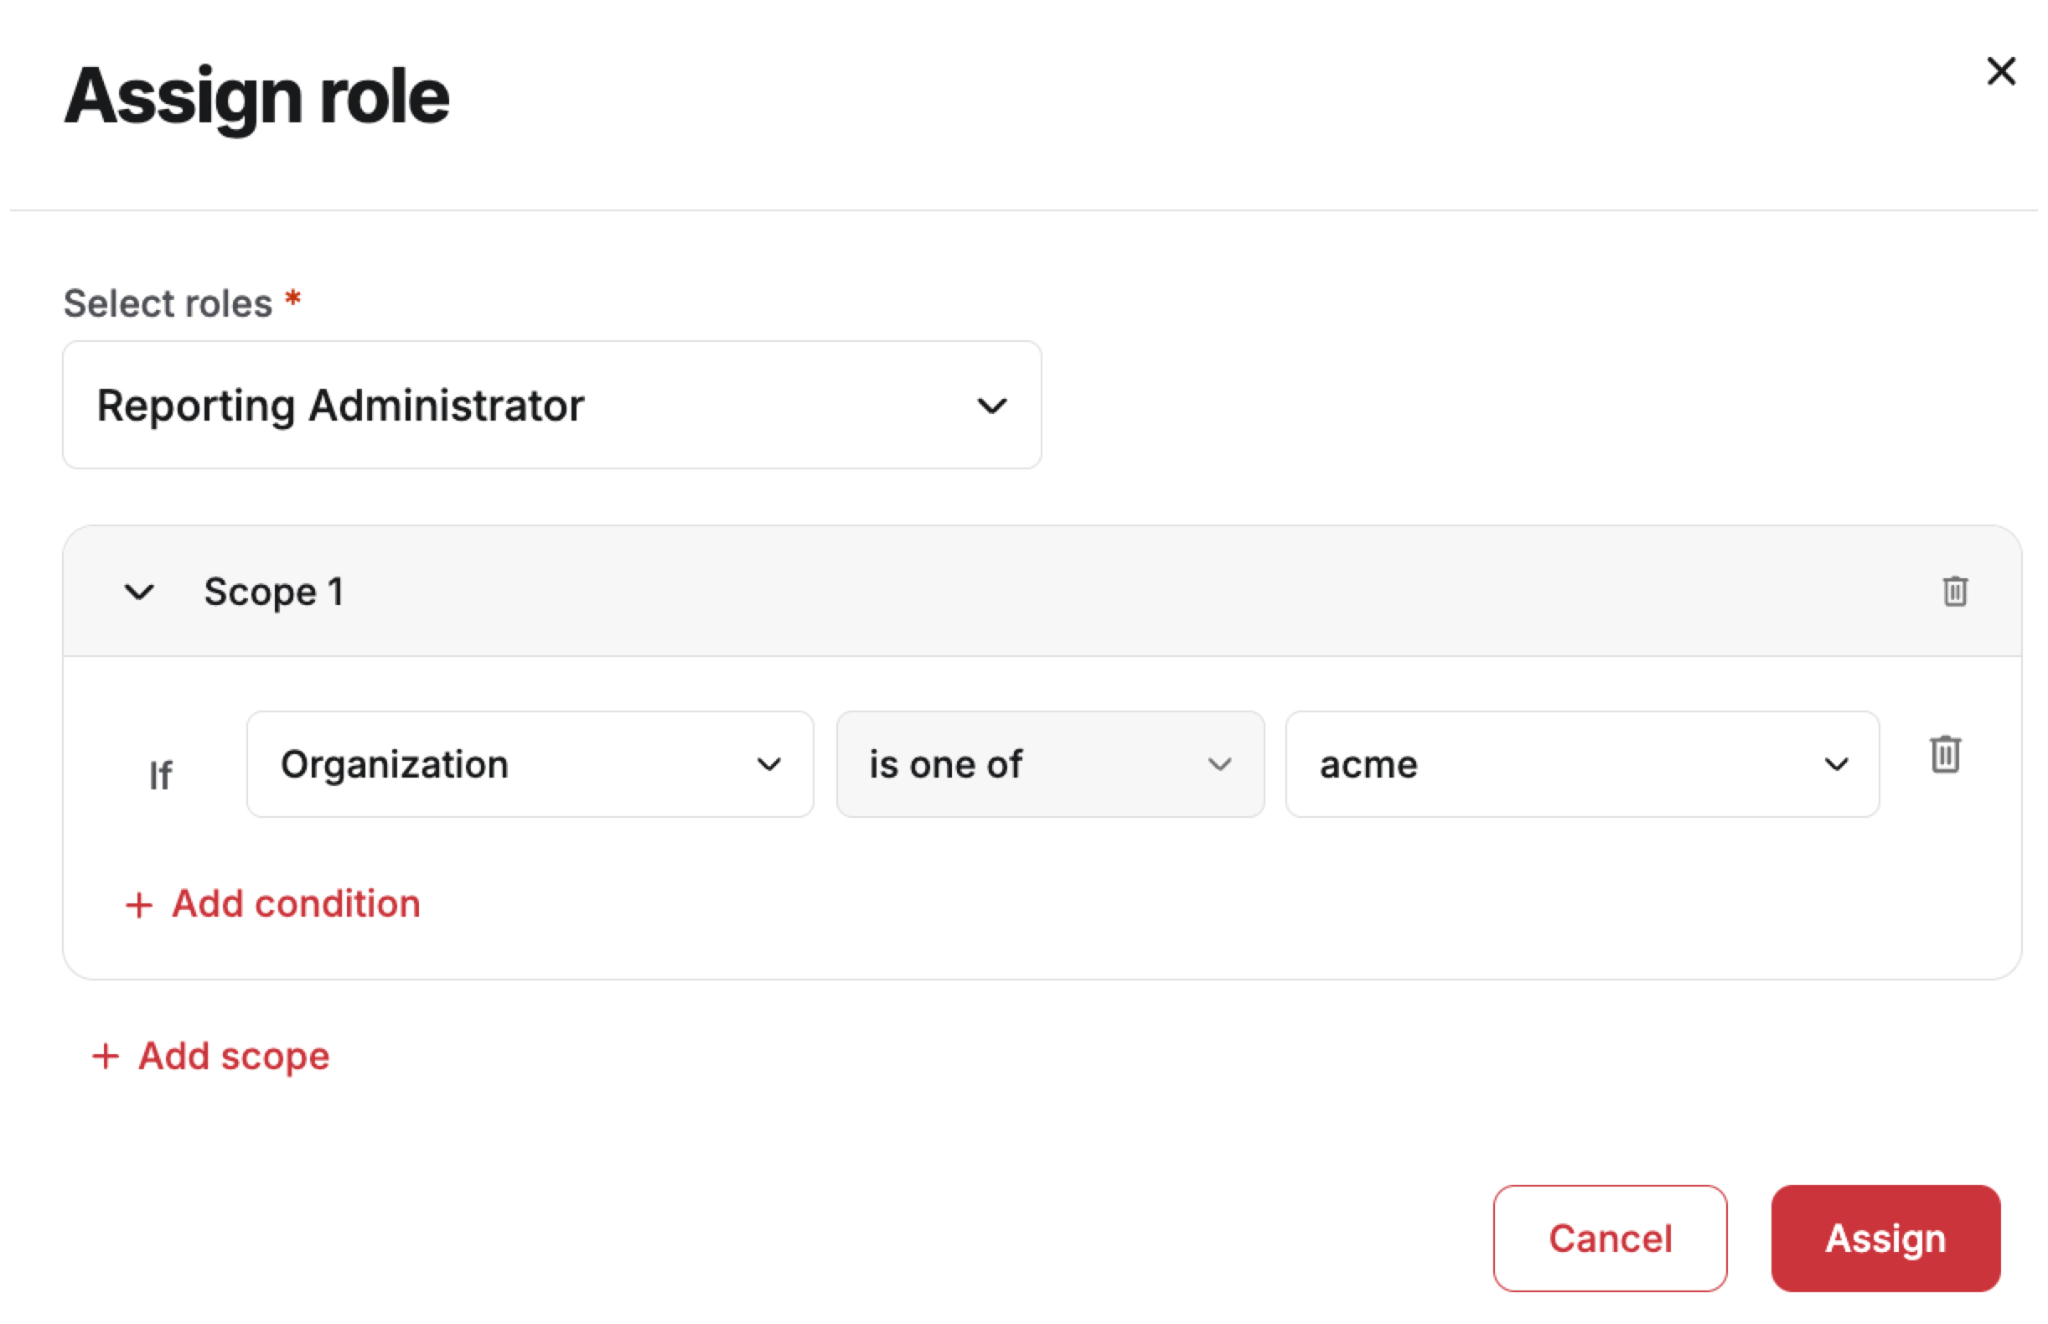
The user groups used in these examples do not initially exist within the system, but you can create them as needed.Use Case 1: Financial Analysts (Company)
Scenario: Your finance team needs to access travel spend reports but should not book travel or see personal traveler information.
Use Case 2: Client-Specific Agents (TMC)
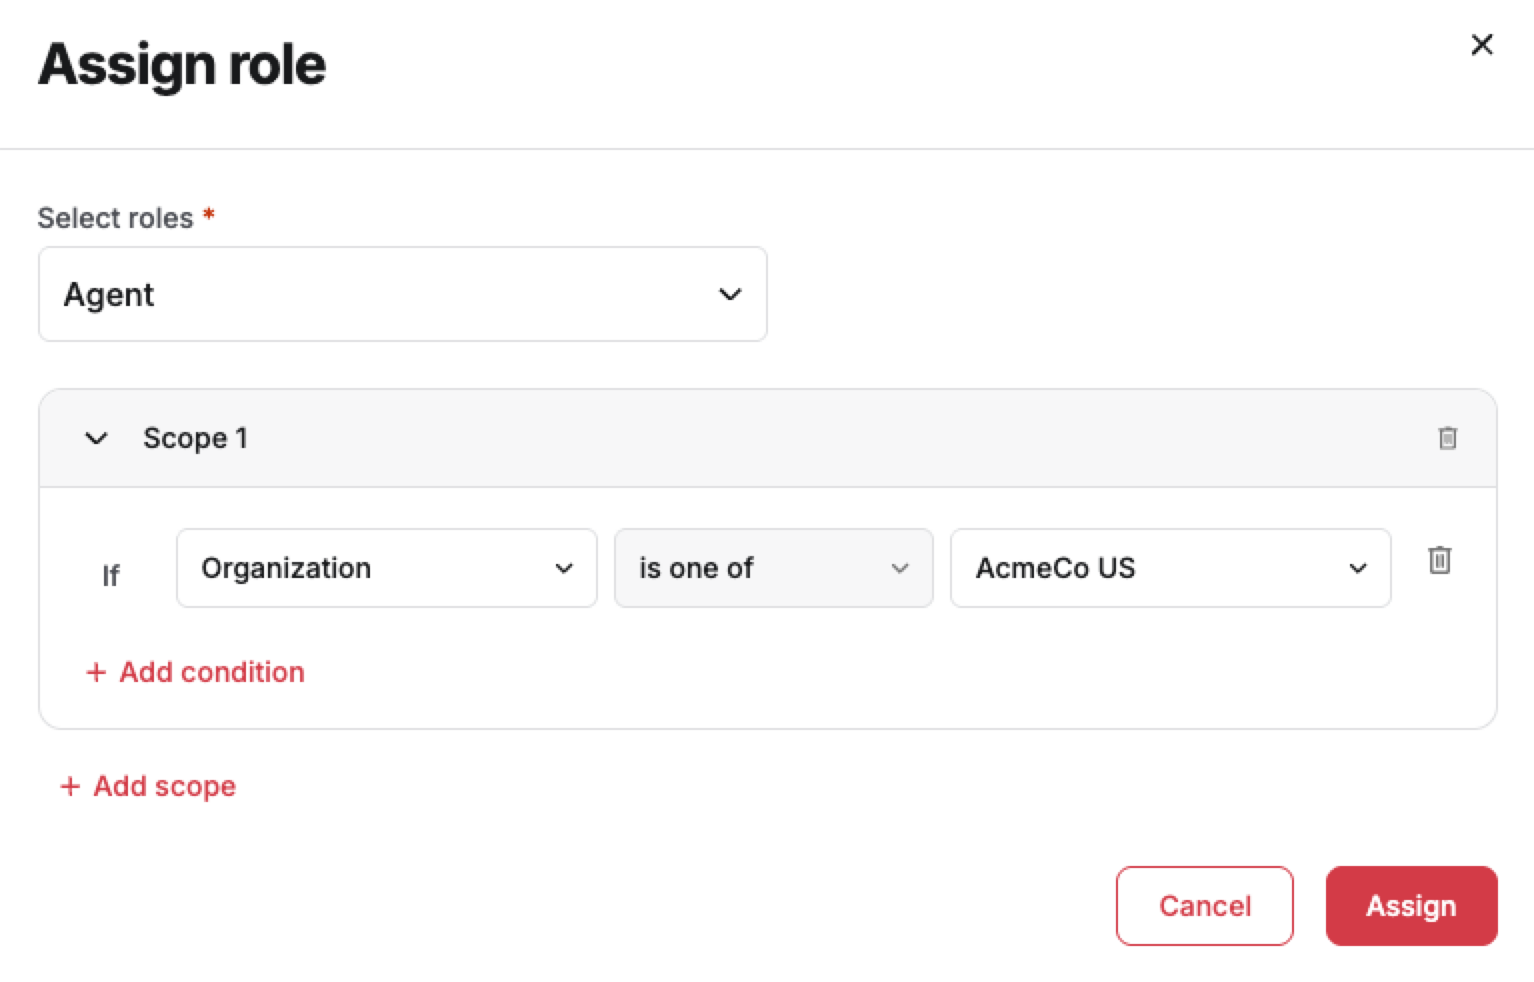
Scenario: Your TMC services multiple clients, but you want a specific group of agents to be the only agents to handle travel for the Acme company (not other clients).
For example, the assignment of the agent role might be done as follows.
Related topics
- Stealth travel - Concepts and management
- User roles and descriptions in detail
- Upload user profile records
Was this article helpful?
That’s Great!
Thank you for your feedback
Sorry! We couldn't be helpful
Thank you for your feedback
Feedback sent
We appreciate your effort and will try to fix the article